Effective Steps to Clear Cache in Edge for Better Browser Performance in 2025
In today’s digital age, maintaining optimal performance in your web browsers is crucial. One effective method to achieve this is by regularly **clearing the cache** in your Edge browser. This article breaks down how to manage your Edge data and offers comprehensive steps on how to clear cache and improve **browser speed**. A well-maintained cache enhances your overall **web browsing** experience, ensures fast loading times, and securely manages your online data.
Understanding Cache Management in Microsoft Edge
The cache plays an essential role in the efficiency of browsers like **Microsoft Edge**. Cache files store copies of frequently accessed web pages and resources, allowing for faster loading speeds when users revisit these sites. However, over time, these cache files can accumulate, negatively impacting browser performance and privacy. Effectively managing this cache is crucial to ensure you are experiencing **fast browsing** without unnecessary delays.
What is Browser Cache?
Browser cache comprises **temporary internet files** stored by the Edge browser to improve performance by reducing loading times. Whenever you visit a website, Edge saves certain elements such as images, scripts, and styles. While caching enhances speed for revisiting, this can also lead to outdated content being displayed on your browser. Clearing your cache and **removing data** such as old **cookies** and **site data** helps ensure that you see the latest versions of applications, thereby optimizing your web experience.
Why Clearing Cache Matters for Performance
Failing to regularly **clear cache** data can lead to various performance issues, such as slow loading pages or buggy web applications. Cached data may also consume a significant portion of your device’s memory, leading to a slowdown of your overall system. Regular cache management not only boosts **browser speed** but also releases space, enhancing the efficiency of your Edge browser. Moreover, it fortifies your **privacy settings**, helping to reduce lingering internet tracking that may compromise your digital security.
How to Clear Cache in Edge Browser
Let’s delve into the step-by-step process of how to clear the cache within **Edge settings**. This procedure is straightforward and can greatly enhance your browsing experience by freeing up space and optimizing **Edge performance**.
Accessing Edge Browser Settings
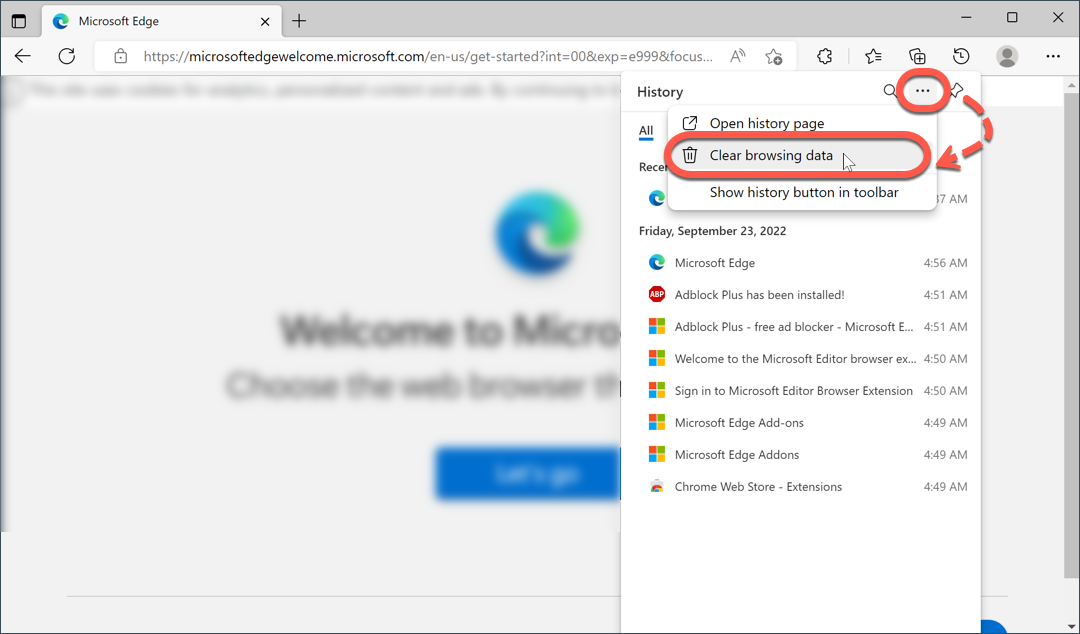
To begin the process of clearing your cache, first, you’ll want to launch your **Edge browser**. Click on the three-dot menu icon located in the top right corner of the **Edge window**. From the drop-down menu, select ‘Settings.’ This area is your control hub for managing various configurations, which includes enforcing your **privacy settings** and clearing cached data.
Navigating to Clear Browsing Data
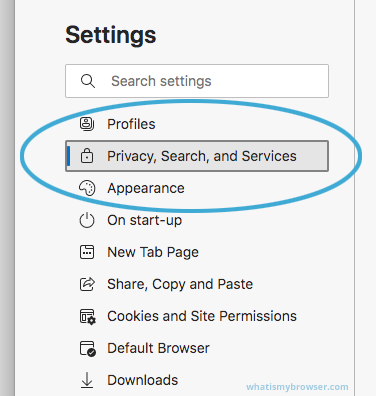
Within the **Edge settings**, look for the “Privacy, search, and services” section. Scroll down until you find the “Clear browsing data” heading and click on “Choose what to clear.” Here, you’ll be presented with options on what types of data you’d prefer to clear. This is also where you can manage **cookies and site data**, select temporary files, or even **clear internet history**. Customizing this selection allows you to manage exactly what kind of data you wish to delete, such as saved logins or entire **cache files**.
Clearing the Data
After you’ve made your selections, click the “Clear now” button. Typically, you’ll want to ensure both the **temporary internet files** and cookies are selected for clean slate management of your browsing experience. This step not only resolves performance issues but also notably strengthens your **privacy measures**. By taking these simple steps, you can ensure your browser runs at peak efficiency, providing you with a fresher and faster online experience.
Best Practices for Maintenance and Optimization
Maintaining a healthy cache is vital for sustained browsing efficiency. To enable ongoing performance success in Edge, consider implementing the following best practices.
Set Up Automatic Cache Clearing
You can leverage the browser’s built-in features to automatically manage temporary files. With **browser settings**, ensure that your settings permit permanent deletion of cache at regular intervals, which can be done by selecting advanced settings. This way, you minimize cache-related **performance issues** without needing to make manual confirmations every time.
Perform Regular Edge Updates
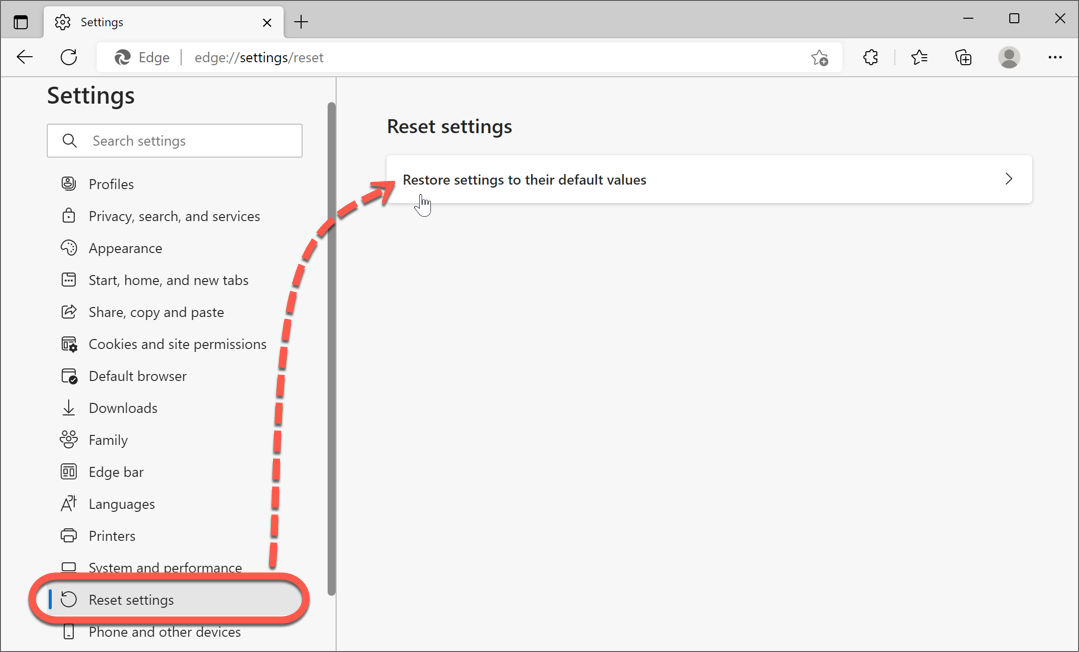
Keeping your Microsoft Edge regularly updated ensures you gain access to the latest performance enhancements and security features. The browser often improves overall **performance optimization**, further aiding your efforts in proper **cache management**. Navigate to Edge settings, then “About Microsoft Edge,” to check for updates on the current Edge version you’re running.
Consider Edge Cleanup Tools
Utilizing cleaning tools within Edge or third-party applications can support the systematic deletion of unwanted data. Look into individual extensions built for cache management; they provide options for ongoing storage analysis to enhance your web browsing device’s longevity and efficiency. Fully understanding **Edge support** resources can also illuminate extra measures you can take for maintaining clean **Edge profiles**.
Key Takeaways for Edge Cache Management
- Caching boost: Recognizing the importance of the cache as a performance enhancer.
- Manual deletion: Steps to manually clear your cache through Edge settings.
- Automatic practices: Implementing regular auto-clearing routines for optimal performance.
- Official support: Utilizing Microsoft resources and tutorials for ongoing assistance.
- Phone-in security: Adopting setups that prioritize user privacy and data security.
FAQ
1. How do I clear cookies in Edge?
To clear cookies in the Edge browser, go to the settings by clicking on the three-dot menu, navigate to “Privacy, search, and services,” and under “Clear browsing data,” select “Choose what to clear.” Ensure that you check the box for “Cookies and site data” before confirming by hitting the “Clear now” button.
2. What happens when I clear my cache?
Clearing your cache will delete all stored **temporary files**, improving your browser’s speed and performance. While it may log you out of websites, it typically helps resolve any performance issues and ensures you access the most updated versions of your web applications.
3. Can clearing the cache fix Edge errors?
Yes, clearing the cache can effectively resolve common **Edge errors** and performance sticks. If you experience issues like pages not loading correctly or crashing, clearing your cache and cookies can often be a crucial step in troubleshooting Edge.
4. Is it necessary to clear my cache on a regular basis?
While not strictly necessary, regularly clearing your cache is recommended for optimal **performance optimization**. Setting it to clear automatically or performing it once every few weeks can significantly enhance your browsing experience while ensuring security.
5. How often should I check for Edge updates?
It is advisable to check for **updates** at least once a month to ensure your browser benefits from the latest performance improvements and security patches. Keeping your **Edge version** up-to-date contributes to a more secure and efficient browsing environment.
6. What are the benefits of managing cache manually?
Manual cache management allows you greater control over what data is retained on your browser and helps prevent the accumulation of unnecessary files. This practice not only enhances speed during web surfing but significantly supports your online privacy, ensuring secure browsing habits.